Thursday 31 May 2012

AutoCompleteTextView

To create a text entry widget that provides auto-complete suggestions, use the AutoCompleteTextView widget. Suggestions are received from a collection of strings associated with the widget through an ArrayAdapter.
For this Explanation we using two xml files:
list_item.xml:
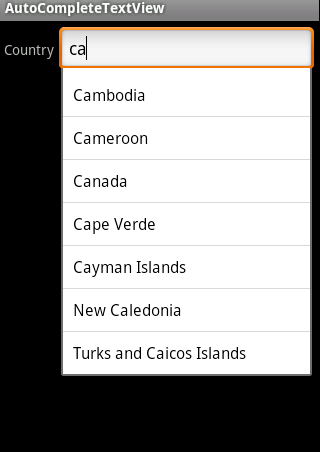
<?xml version="1.0" encoding="utf-8"?>
<TextView xmlns:android="http://schemas.android.com/apk/ res/android"
    android:layout_width="fill_parent"
    android:layout_height="fill_parent"
    android:padding="10dp"
    android:textSize="16sp"
    android:textColor="#000">
</TextView>
  main.xml:
 <?xml version="1.0" encoding="utf-8"?>
<LinearLayout xmlns:android="http://schemas.android.com/apk/
                                    res/android" 
    android:orientation="horizontal"
    android:layout_width="fill_parent" 
    android:layout_height="wrap_content"
    android:padding="5dp">
    <TextView
        android:layout_width="wrap_content"
        android:layout_height="wrap_content"
        android:text="Country" />
    <AutoCompleteTextView android:id="@+id/autocomplete_country"
        android:layout_width="fill_parent"
        android:layout_height="wrap_content"
        android:layout_marginLeft="5dp"/>
</LinearLayout>
Add below lines to your java class,
static String[] COUNTRIES = new String[] {
  "Afghanistan", "Albania", "Algeria", "American Samoa", 
 "Andorra",  "Angola", "Anguilla", "Antarctica", "Antigua
 and Barbuda", "Argentina",  "Armenia", "Aruba", "Australia", 
 "Austria", "Azerbaijan",  "Bahrain", "Bangladesh", "Barbados",
  "Belarus", "Belgium",  "Belize", "Benin", "Bermuda", "Bhutan",
  "Bolivia",  "Bosnia and Herzegovina", "Botswana", "Bouvet Island",
  "Brazil", "British Indian Ocean Territory","British Virgin Islands",
  "Brunei", "Bulgaria", "Burkina Faso", "Burundi","Cote d'Ivoire",
  "Cambodia", "Cameroon"}; 
    AutoCompleteTextView textView = (AutoCompleteTextView) 
                     findViewById(R.id.autocomplete_country);
    ArrayAdapter<String> adapter = new ArrayAdapter<String>
                    (this, R.layout.list_item, COUNTRIES);
    textView.setAdapter(adapter);
 AutoCompleteTextView widget is captured from the layout with  
findViewById(int). A new ArrayAdapter is then initialized to 
bind the list_item.xml layoutto each list item in the COUNTRIES 
 string array (defined in the next step).Finally, setAdapter() 
is called to associate the ArrayAdapter with the AutoCompleteTextView
widget so that the string array will populate the list of suggestions. 
Here is the ScreenShot:


Wednesday 30 May 2012

Sending Email in Android

In Android, you can use Intent.ACTION_SEND to call an existing email client to send an Email.


Follow the below steps:


Intent email = new Intent(Intent.ACTION_SEND);
email.putExtra(Intent.EXTRA_EMAIL, new String[]
{"youremail@gmail.com"});
email.putExtra(Intent.EXTRA_SUBJECT, "subject");
email.putExtra(Intent.EXTRA_TEXT, "message");
email.setType("plain/text");
startActivity(Intent.createChooser(email,"Send mail..."));


Here ACTION_SEND used for Deliver some data to someone else.Who the data
is being delivered to is not specified; it is up to the receiver of this action to ask the
user where the data should be sent.
When launching a SEND intent, you should usually wrap it in a chooser (through
createChooser(Intent, CharSequence)), which will give the proper interface for the
user to pick how to send your data and allow you to specify a prompt  indicating
what they are doing.
Input: setType() is the MIME type of the data being sent. putExtra can have either
a EXTRA_TEXT or EXTRA_STREAM field, containing the data to be sent. If using
EXTRA_TEXT, the MIME type should be "text/plain".


Here is my main.xml:


<?xml version="1.0" encoding="utf-8"?>
<LinearLayout xmlns:android="http://schemas.android.com/apk/res/android"
android:id="@+id/LinearLayout01"
android:layout_width="fill_parent"
android:layout_height="fill_parent"
LinearLayout=""
android:orientation="vertical" >


    <LinearLayout
        android:id="@+id/LinearLayout02"
        android:layout_width="wrap_content"
        android:layout_height="wrap_content"
        android:orientation="horizontal" >


        <EditText
            android:id="@+id/emailaddress"   
            android:layout_width="wrap_content"
            android:layout_height="wrap_content"
            android:width="170dip" >
        </EditText>


        <TextView
            android:id="@+id/emailaddress"
            android:layout_width="wrap_content"
            android:layout_height="wrap_content"
            android:text="Email address" >
        </TextView>
    </LinearLayout>


    <LinearLayout
        android:id="@+id/LinearLayout03"
        android:layout_width="wrap_content"
        android:layout_height="wrap_content"
        android:orientation="horizontal" >


        <EditText
            android:id="@+id/emailsubject"
            android:layout_width="wrap_content"
            android:layout_height="wrap_content"
            android:width="170dip" >
        </EditText>


        <TextView
            android:id="@+id/emailsubject"
            android:layout_width="wrap_content"
            android:layout_height="wrap_content"
            android:text="Subject" >
        </TextView>
    </LinearLayout>


    <EditText
        android:id="@+id/emailtext"
        android:layout_width="wrap_content"
        android:layout_height="wrap_content"
        android:lines="5"
        android:width="300dip" >
    </EditText>


    <Button
        android:id="@+id/emailsendbutton"
        android:layout_width="wrap_content"
        android:layout_height="wrap_content"
        Send=""
        android:width="150dip" >
    </Button>


</LinearLayout>


My class file is:
public class Email extends Activity {
    Button send;
    EditText address, subject, emailtext;
@Override
public void onCreate(Bundle savedInstanceState) {
    super.onCreate(savedInstanceState);
    setContentView(R.layout.main);
    send=(Button) findViewById(R.id.emailsendbutton);
    address=(EditText) findViewById(R.id.emailaddress);
    subject=(EditText) findViewById(R.id.emailsubject);
    emailtext=(EditText) findViewById(R.id.emailtext);
  
    send.setOnClickListener(new OnClickListener() {
                    @Override
                    public void onClick(View v) {
                            // TODO Auto-generated method stub
          final Intent emailIntent = new Intent(android.content.Intent.ACTION_SEND);
         emailIntent.setType("plain/text");
         emailIntent.putExtra(android.content.Intent.EXTRA_EMAIL, new String[] {address.getText().toString()});                            
         emailIntent.putExtra(android.content.Intent.EXTRA_SUBJECT, subject.getText());
         emailIntent.putExtra(android.content.Intent.EXTRA_TEXT, emailtext.getText());
         Email.this.startActivity(Intent.createChooser(emailIntent, "Send mail..."));


                    }
            });
}
}


Note
Android does not provide API to send Email directly, you have to call the existing Email client to send Email.
For this we need to configure Email client in our device/Emulator.

Tuesday 29 May 2012

Eclipse Settings

We can change Eclipse Settings for different aspects  by following below steps:

Adding  numbers to java class:

Here we can add the line numbers to our class, for that..
Windows -> Preferences ->General ->Editors ->TextEditors 
      and check the showLine numbers. ->Apply

LogCat settings:

If we want to change the styles of LogCat , then Go to
Windows ->Preferences ->Android ->LogCat ->Change(Button)
 Choose your styles and click OK

ShortCut Keys for Eclipse:

There are number of shortcut Key for Eclipse, For those  Ctrl+ Shift+L 
It will display all available shortcut keys

Taking Screen Shots from device Using DDMS:

 Connect the device two system, then choose the 
Windows ->Showview ->Devices ->(Choose your device) ->Screen Capture(Top of the window with camera Image)

Open the screens in your device, then it will show under Screen Capture, and click Save button to save the captured Image in your given path.


Multiple Notifications Using AlarmManager

Notifications are used in Two Ways.

1.To start some action, if a particular event happens(Single Notification).
2.To do some particular actions in every time interval(Multiple Notifications).

Here we go through MultipleNotifications, For this we mainly using two classes, Those are
     . AlarmManager
     . NotificationManager

We need to get the object of the AlarmManager using getSystemService(), then define an intent with parameters as the current context and the BoradcastReceiver class(TimeAlarm). Then define a pendingIntent, we will get the object of it using PendingIntent.getBroadcast(). Now we can call setRepeating() method 
of the AlarmManager to repetitive action.

In TimeAlarm, to show to user that our AlarmManager is working we will show a notification in status bar. For that first get the object of NotificationManager using, getSystemService(). Create an object of pendingIntent using PendingIntent.getActivity(). Then create an object of the notification and pass it to the notification manager object.

Here is Our classes:

NotificationActivity.java: 

public class NotificationActivity extends Activity {

    AlarmManager am;

     @Override
     public void onCreate(Bundle savedInstanceState) {
      super.onCreate(savedInstanceState);
      setContentView(R.layout.main);
      am = (AlarmManager) getSystemService(Context.ALARM_SERVICE);
      setRepeatingAlarm();
     }

      public void setRepeatingAlarm() {
      Intent intent = new Intent(this, TimeAlarm.class);
      PendingIntent pendingIntent = PendingIntent.getBroadcast(this, 0,
        intent, PendingIntent.FLAG_CANCEL_CURRENT);
      am.setRepeating(AlarmManager.RTC_WAKEUP, System.currentTimeMillis(),
        (10 * 1000), pendingIntent);
      System.out.println("Calling Alaram...");
     }
}


Here we using  'FLAG_CANCEL_CURRENT'  flag for cancel the current notification and have
 possibilty for next notification. In our example our notification repeated for every 10 seconds.
 For this we can observe in status bar. Notification time will be change, i.e notification repeated
 for every 10 seconds.

TimeAlarm.java:

public class TimeAlarm extends BroadcastReceiver {

     NotificationManager nm;

     @Override
     public void onReceive(Context context, Intent intent) {
      nm = (NotificationManager) context
        .getSystemService(Context.NOTIFICATION_SERVICE);
      CharSequence from = "Lokesh";
      CharSequence message = "Notification Test...";
      PendingIntent contentIntent = PendingIntent.getActivity(context, 0,
        new Intent(), 0);
      Notification notif = new Notification(R.drawable.ic_launcher,
        "Notification Test...", System.currentTimeMillis());
      notif.setLatestEventInfo(context, from, message, contentIntent);
      nm.notify(1, notif);
     }
     }


For this we have to add receiver in manifest.xml

<application>
        <receiver android:name=".TimeAlarm" >
            <intent-filter>
                <action android:name="android.intent.action.BOOT_COMPLETED" />
            </intent-filter>
        </receiver>
     ............
</application>


For single notification , we can call the setOneTimeAlarm() method  from the place of setRepeatingAlarm();

Here is the method:
public void setOneTimeAlarm() {
  Intent intent = new Intent(this, TimeAlarm.class);
  PendingIntent pendingIntent = PendingIntent.getBroadcast(this, 0,
    intent, PendingIntent.FLAG_ONE_SHOT);
  am.set(AlarmManager.RTC_WAKEUP,
    System.currentTimeMillis() + (5 * 1000), pendingIntent);
 }


Monday 28 May 2012

Obtaining Google Maps API Key

Registering for a Maps API Key is simple, free, and has two parts:
  1. Registering the MD5 fingerprint of the certificate that you will use to sign your application. The Maps registration service then provides you a Maps API Key that is associated with your application's signer certificate.
  2. Adding a reference to the Maps API Key in each MapView, whether declared in XML or instantiated directly from code. You can use the same Maps API Key for any MapView in any Android application, provided that the application is signed with the certificate whose fingerprint you registered with the service.
During registration, you also need to agree to the Maps API Terms of Service, which describe how your application can use the Maps data.
MapView elements must refer to a Maps API Key, you need to register your certificate and receive a Key before you can make use of MapView elements in your application. To make it easier for you to get started using MapView elements, you are welcome to register the debug certificate generated by the SDK tools and receive a temporary Maps API Key.
To summarize, the important points to understand about MapViews and the Maps API Key are:
  • To display Maps data in a MapView, you need to register for a Maps API Key
  • Each Maps API Key is uniquely associated with a specific certificate, based on an MD5 fingerprint of the certificate
  • Each MapView must reference a Maps API Key, and the Key referenced must be registered to the certificate used to sign the application
  • All MapView elements in an application can reference the same Maps API Key
  • You can register multiple certificates under your developer identity
  • You can get a temporary Maps API Key based on your debug certificate, but before you publish your application, you must register for a new Key based on your release certificate and update references in your MapViews accordingly
Keytool Option                                  Description
-list                        Print an MD5 fingerprint of a certificate.
-keystore <keystore-name>
.keystore                                       The name of the keystore containing the target key.
-storepass <password>          A password for the keystore.
As a security precaution, do not include this option in your command line unless you are working at a secure computer.If
not supplied, Keytool prompts you to enter the password. In this way,your password is not stored in your shell history.


-alias <alias_name>         The alias for the key for which to generate the MD5 certificate fingerprint.
-keypass <password>         The password for the key.As a security precaution, do not include this option in your command line unless you are working at a secure computer.If not supplied, Keytool prompts you to enter the password. In this way, your password is not stored in your shell history.


For this first you choose your directory where your  debug.keystore files resides i.e .android.
 write below commends in command prompt.
C:\Users\yourusername\.android>
and choose your keytool under bin folder of java that resides under
programfiles.
 i.e C:\Users\yourusername\.android>"C:\Program Files\Java\jre\bin\keytool" 
-list -alias androiddebugkey
-keystore debug.keystore -storepass android -keypass android 
 Keytool will prompt you to enter passwords for the keystore and key. As
output of the command, Keytool prints the fingerprint to the shell. For
example:Certificate fingerprint (MD5): 94:1E:43:49:87:73:BB:E6:A6:88:D7:20
:F1:8E:B5:98 
 After generating the certificate, paste it in 
https://developers.google.com/android/maps-api-signup 
Now it generates the Api key.
 Adding the Maps API Key to your application: 
 <com.google.android.maps.MapView
 android:layout_width="fill_parent"
 android:layout_height="fill_parent"
 android:enabled="true"
 android:clickable="true"
 android:apiKey="example_Maps_ApiKey_String"
 /> 
Enable MapView Elements:
 Make sure that you added a <uses-library> element
referencing the external com.google.android.maps library. The
element must be a child of the <application> element in the
application's manifest. For example:
 <manifest xmlns:android="http://schemas.android.com/apk/res/android"
 package="com.example.package.name">
 ...
 <application android:name="MyApplication" >
   <uses-library android:name="com.google.android.maps" />
 ...
 </application> 

Android activity's lifecycle

There are three key loops you may be interested in monitoring within your activity:

The entire lifetime of an activity happens between the first call to onCreate(Bundle) through to a single final call to onDestroy().
The visible lifetime of an activity happens between a call to onStart() until a corresponding call to onStop().
The foreground lifetime of an activity happens between a call to onResume() until a corresponding call to onPause()

onCreate(): Called when the activity is first created. This is where you should do all of your normal static set up: create views, bind data to lists, etc. This method also provides you with a Bundle containing the activity's previously frozen state, if there was one.
Always followed by onStart()

onRestart(): Called after your activity has been stopped, prior to it being started again.
Always followed by onStart()
onStart(): Called when the activity is becoming visible to the user.
Followed by onResume() if the activity comes to the foreground, or onStop() if it becomes hidden.

onResume():Called when the activity will start interacting with the user. At this point your activity is at the top of the activity stack, with user input going to it.
Always followed by onPause().

onPause():Called when the system is about to start resuming a previous activity. This is typically used to commit unsaved changes to persistent data, stop animations and other things that may be consuming CPU, etc. Implementations of this method must be very quick because the next activity will not be resumed until this method returns.
Followed by either onResume() if the activity returns back to the front, or onStop() if it becomes invisible to the user.

onStop():Called when the activity is no longer visible to the user, because another activity has been resumed and is covering this one. This may happen either because a new activity is being started, an existing one is being brought in front of this one, or this one is being destroyed.
Followed by either onRestart() if this activity is coming back to interact with the user, or onDestroy() if this activity is going away.

onDestroy(): The final call you receive before your activity is destroyed. This can happen either because the activity is finishing (someone called finish() on it, or because the system is temporarily destroying this instance of the activity to save space. You can distinguish between these two scenarios with the isFinishing() method


StartActivityForResult

 Start another activity from your activity and it expect to get some data from child activity and return that to parent activity.
Here,  CallingActivity.java expect result from CalledActivity.java,
CallingActivity.java
public class CallingActivity extends Activity {
    /** Called when the activity is first created. */
    int requestCode;
    TextView show;
    Button start;
    @Override
    public void onCreate(Bundle savedInstanceState) {
        super.onCreate(savedInstanceState);
        setContentView(R.layout.main);
       
        start = (Button)findViewById(R.id.button1);
        show = (TextView)findViewById(R.id.text);
       
        start.setOnClickListener(new OnClickListener() {
           
            @Override
            public void onClick(View v) {
                // TODO Auto-generated method stub
                Intent i = new Intent(CallingActivity.this,CalledActivity.class);     
                startActivityForResult(i, requestCode);
               
            }
        });
       
    }
   
    @Override
    protected void onActivityResult(int requestCode, int resultCode, Intent data) {
        Log.d("CheckStartActivity","onActivityResult and resultCode = "+resultCode);
        // TODO Auto-generated method stub
        String value;
        super.onActivityResult(requestCode, resultCode, data);
        if(resultCode==1){
            Toast.makeText(this, "Pass", Toast.LENGTH_LONG).show();
            value = Integer.toString(resultCode);
            show.setText(value);
        }
        else{
            Toast.makeText(this, "Fail", Toast.LENGTH_LONG).show();
        }
    }
}
CalledActivity.java
public class CalledActivity extends Activity {
    @Override
    public void onCreate(Bundle savedInstanceState) {
        super.onCreate(savedInstanceState);
        Log.d("CalledActivity","OnCreate ");
        //String value = "rahul";
        Intent in = new Intent();
        setResult(1,in);//Here I am Setting the Requestcode 1, you can put according to your requirement
        finish();
    }
}